Dec 20, 2009

Solid Ink Splatter: Photoshop Brushes


Add grunge to your artwork with this set of 50 artistic ink splatters. These ink splatters were created from acrylic ink then scanned at high resolution for excellent edge sharpness. Get your Solid Ink Splatter Photoshop today!

Download: 


Small (675 pixels) | Photoshop 7+ | Free Download

Medium (1250 pixels) | Photoshop 7+ | Free Download

Large (2500 pixels) | Photoshop 7+ |

Download Dried Blood Splatters: Photoshop Brushes


These splatter brushes were created with watercolor dried on lightweight paper to simulate the look of dried blood. Like our Glossy Blood Splatter Photoshop brushes, these can be used to create blood, paint, or paint in UV light. This set contains 117 blood splatter brushes.

Download:-

For 675 pixels :  Download Dried Blood Splatters


For 1250 pixels :  Download Dried Blood Splatters

Dec 14, 2009

How to Create Intense Light Streaks in Photoshop - Photoshop Tutorial For Intense Light Streaks


Firstly find a subject to base the flowing light streams on. I picked out an image of a drinks can to relate to the original piece of artwork that inspired the subscriber.
Using the Pen Tool draw a path around the object, make the selection and paste into a new document using a black background.


Reselect the object by CMD/CTRL + Click on the layer, go to Select > Feather and enter 1px. Inverse the selection and hit delete.
Duplicate the layer and set the layer style to Multiply, drop the Opacity to suit.
These tips help the object blend with the background a little more realistically by erasing out the hard edges and altering the lighting and shadows.


On a new layer draw a circular marquee and add a Gradient fading to black with a colour of your choice, here I've chosen a cool green.
Transform the gradient and squash it vertically to add a little perspective.


Open up some kind of texture and paste it into the document. This particular image is a watercolour texture from the GoMedia Freebies. Desaturate to remove the colour.


Change the blending mode to Multiply to render the white areas of the texture transparent.


Back on the can or object layer add an Outer Glow through the Layer Styles, the key is to change the blending mode to Color Dodge to give a really intense glow.

Prepare a brush for creating the flowing light streams, experiment with the brush settings to give a thin tapered stroke. The main option to adjust is the Control and Minimum Diameter settings in the Shape Dynamics section.

Use the Pen Tool to draw a smooth flowing path, with the Pen Tool still selected right click and select Stroke Path, ensure the Brush option is selected along with Simulate Pressure.


Add another Outer Glow to the layer of the brush stroke using similar Color Dodge settings.

Draw as many streams as you like around the object, keeping the lines flowing as smoothly as possible in a variety of directions.

The Color Dodge effect works the best when the objects overlap the coloured gradient, here I scale up the gradient to allow for more light effects around the object.

Unfortunately the straight edges of the texture layer show through, use a large eraser to blend them out.

Add a little atmosphere to the object by placing a few blobs of colour on a new layer. Changing the blending mode to Soft Light will give a slight green glow to the object as if it is reflecting the green light from the intense glowing lines, overall adding a little more realism.

Make a selection from the object layer, inverse and delete out the unwanted area.

The light streams look okay flowing out from underneath the object but they would look a little better if they interacted in some way. Move the light stream layer above the object.

Erase out the majority of the lines leaving select areas which blend into or around the object.

A common addition to this trendy style is an array of glowing light particles. Setup another brush, this time play around with the Scatter, Spacing and Size Jitter options.


Brush in a range of dots and blobs with varying brush sizes to cover the whole of the object and flowing lines. Add the same Outer Glow layer style as the light stream layer.

Erase out the most of the particles to leave a subtle effect with slight differences in opacity.


Finish off the image with a few focal rings on multiple layers with very low opacity. These help relate to the objects that appear when photographing light with a camera, adding a little extra realism.

Dec 13, 2009

Make a Wavy Blackberry Style Wallpaper : Design Wavy Blackberry


Step 1

Create a new document, using a black color for the background.
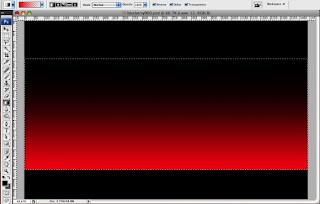
Step 2

With the Rectangular Marquee Tool (M), create a rectangular selection. Then select the Gradient Tool (G), and use red for the color of the gradient for both the start and the end, but use 100% and 0% for the Opacity so the gradient will go from red to transparent. Then create a new layer and fill it with the gradient, as in the image below.
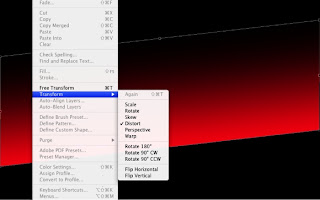


Step 3

Go to Edit>Transform>Distort and distort the rectangle, as in the image below.


Step 4

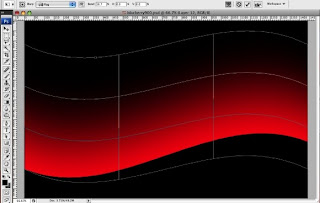
Go to Edit>Transform>Warp. Then select Flag and use 20% for the Bend.


Step 5

Create another Rectangle and fill it with the same red to transparent gradient. Set the height smaller than the first one. Then repeat the Warp command; however, this time make it to the opposite way, as in the image below.


Step 6

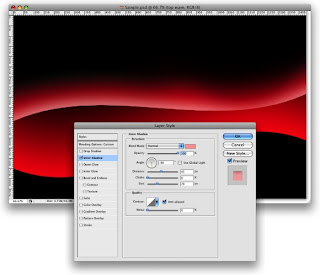
Lets add a Layer Style to the shape. Go to Layer>Layer Style>Inner Shadow, use a light pink color (#ffb3b3). Set the Angle at -90 degrees, Distance 45px, Choke 0%, and the Size 70%.


Step 7

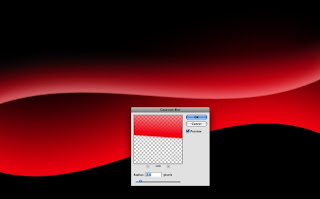
Now go to Filter>Blur>Gaussian Blur, use 2px for the Radius.


Step 8

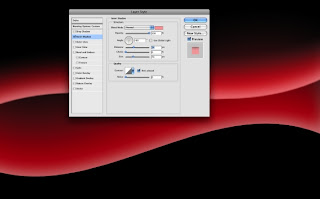
Repeat Step 6 for the other shape.


Step 9

With the Pen Tool (P), create some paths, as in the image below. We will use them to create some light effects.
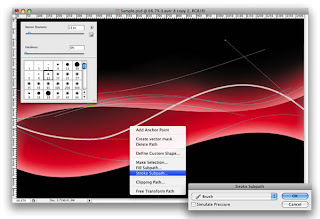


Step 10

First create a new folder, and rename it "Lines". Then change the Blend Mode to Screen. Thereafter select the Brush Tool. Grab a basic brush with 0% Hardness and 13px size. Then with the Direct Select Tool(A), select a path. With the right button of the mouse choose Stroke Subpath. Then the dialog box will open. Make sure that Simulate Pressure is not selected and Press OK.
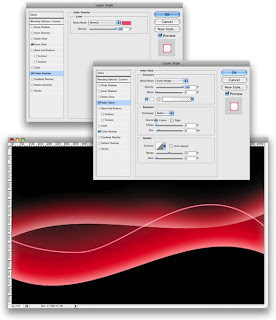


Step 11

Lets create a Layer Style for the lines. Use Inner Glow with Color Dodge for the blend mode. Set white as the color, 100% Opacity, Choke 0%, and size 8px. After that select Color Overlay and use pink for the color (#ff5c78).
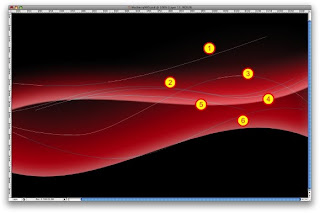


Step 12

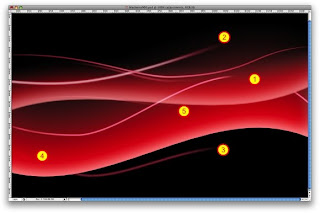
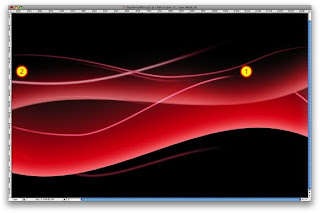
Repeat Step 10 with the other paths. Always create a new layer for each path. You can vary the size of the brush, and you can use Simulate Pressure with some paths, as I did in the image below (1, 2, and 3).
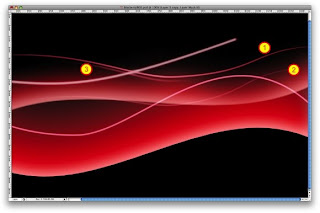


Step 13

Let's Mask some paths, and create new ones duplicating existing paths. With number 1, select the layer of the path and go to Layer>Layer Mask>Reveal all. Then select a brush with 0% Hardness and a medium size, like 50px. Then select black for the color and start masking that line. Repeat this with numbers 2, 3, 4, and 5.


Step 14

Here we'll make some adjustments to the shapes. Yet again, select the Shape Layer. Then go to Layer>Layer Mask>Reveal All. Then with a black brush, start masking some areas of the shapes. Tip: you can simply delete the layer as well. Just use the Eraser instead of masking it.


Step 15

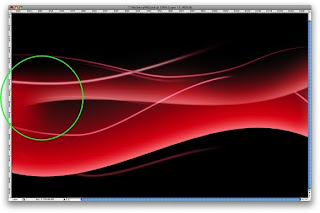
Create a new layer beneath the lines but above the shapes. Then select red and select a big 100px brush. Make sure that the Hardness is 0%. Click 1–2 times, only click enough times to create an effect like the one in the image below.


Step 16

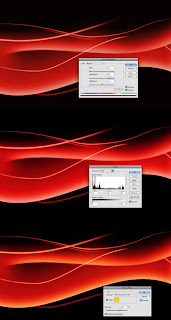
Go to Layer>New Adjustment Layer>Hue and Saturation. Make sure you select Colorize and use Hue 11, Saturation 82, and Lightness +4. Then go to Layer>New Adjustment Layer>Levels. Follow the image below for reference. After that go to Layer>New Adjustment Layer>Photo Filter. Use yellow, and Density of 85%. Make sure that you select Preserve Luminosity.
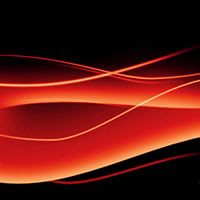


At Last

In this tutorial we created an abstract design similar to the new Blackberry's wallpaper. It shouldn't have taken you more than 40 minutes to finish. Even though it might look simple, this tutorial has very useful techniques. You can use them to create some nice lighting effects and wavy designs. Besides that, you will be able to create a Vista-style wallpaper using these techniques as well (as some readers requested), just change some colors and Layer Styles and you'll have it.


Related Posts with Thumbnails